
Installing your own security camera system can be very rewarding and save you a lot of money compared to hiring a professional to do it. Most home owners experienced with common home improvement projects should be able to install their own security camera system without too much trouble, and will then have the knowledge required to expand or repair it themselves if needed in the future.
These basic steps are the same whether you’re installing a complete packaged system or individual pieces that you’ve selected. This guide is also generic enough that it applies to all camera housing types, and while we’re only covering IP network cameras, the thought process is similar to what would be done if you were installing older analog CCTV technology.
Always test your cameras before installing them.
Whenever you have a new camera it should be tested and configured on the bench before mounting it in a permanent location. This is especially important if it’s going to be a new installation with new cabling, and will greatly help you troubleshoot things if you get a camera mounted outside and it has problems, since you already know that the camera worked properly on the bench.
Choose a location for your NVR or PoE switch.
Most security camera systems that come with an NVR will want you to wire each camera directly to the NVR. Custom solutions will likely use one or more PoE switches to give the cameras power and connectivity. You’ll want this equipment located in an out of the way place so intruders can’t easily find it, but also somewhere there is AC power and adequate ventilation. A basement utility room is often a good location, as it may have a good path to get Ethernet cables to the cameras around the rest of the house. I suggest installing a UPS at this location too, so your system will keep running through brief power outages.
Choose a mounting location for each camera.
There are always trade-offs when trying to find the best mounting location for each camera. Do the best that you can in each of these areas and you’ll end up with a reliable, low maintenance, and long-lasting installation that provides you with the best possible image quality.
- Positioned so it can get good coverage of the desired area, most important.
- On a solid mounting surface – we don’t want the camera to move at all.
- Out of the easy reach of people if possible.
- Protected from the weather if possible.
- Has a good path for wiring, preferable concealed.
- Also think about possible issues, like don’t point it directly at a bright nearby light.
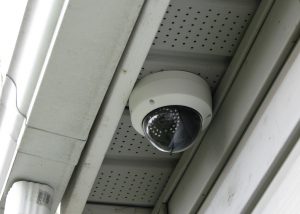
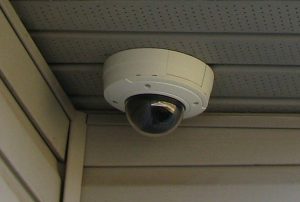
Underneath of a soffit or other roof overhang is a common mounting location for cameras that usually meets all these requirements. Soffits and siding made of wood or other solid materials are normally sturdy enough to mount cameras directly on. If you have vinyl or aluminum siding or soffits they may not be solid enough to securely hold a camera by themselves, but this is easy to fix by adding some wood behind it to beef things up if needed. These types of locations also usually have a direct path to the attic for wiring, but decide where you think you want the cameras, and then take a look in the attic and make sure you can get a cable from each camera back to your NVR or PoE switch. It’s usually pretty straight forward in a single-story home, but can get interesting in homes with more than one level. Vaulted ceilings and other unique situations can cause problems, so make sure there is a path for all needed cables before attempting to install anything.
Mount and wire each camera.
At this point I would do the following steps for each camera, and completely finish installing one camera before moving on to the next one. Depending on your particular installation it may make sense to do things differently.
Mark the mounting point and make a hole for the wiring.
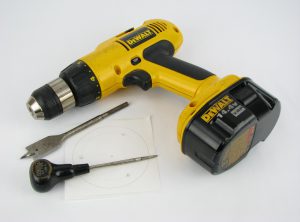
New cameras usually come with a mounting template, and for the most common housing styles it gives you the exact positions of a center hole approximately 1″ in diameter for wiring, and three or more holes around that for mounting screws. Keep this in mind because there must be a path for the wiring wherever you make that center hole, and each screw must go into something solid. Most templates are adhesive-backed, and designed so that you can just stick the template where you want the camera and you’re ready to drill. I don’t suggest doing that though, and here’s why. The first hole you want to drill is the large hole for the wiring in the middle, so you stick that 1″ paddle bit in the center and squeeze the trigger on the drill, and as soon as that bit makes full contact with the template it sometimes rips the template off of your mounting surface, possibly destroying it in the process. Adhesive templates only work well on new clean surface, and not most building exteriors that have been exposed to the weather.
I leave the template backing attached, and hold it against the surface where I want to mount the camera, marking the center of each hole with an awl. That way I still have a nice template when I’m done in case I want to put the camera in another location someday. You might also hit a stud or other unknown obstruction on your first attempt and need to change the location slightly.
Run an Ethernet cable to the camera location.
Once you have a hole for the wiring you can run an Ethernet network cable from there to your central location. Each cable should be CAT 5 or better, and no more than 100 meters in length. You can use bulk cable that you terminate with jacks or plugs, or you can just use factory made pre-terminated cables. Be sure to leave some extra cable as a service loop at each end. Always label each cable with a unique name or number as you run them, so you can identify each cable at your central location in the future.
Mount and adjust the camera.
Now is the time to connect the network cable and mount the camera with screws where we marked the locations before. Hopefully your system has a Smartphone app that gives you a live video feed, which makes it really easy to adjust and fine-tune the final position of the camera as you watch the image.
The first camera should be fully operational at this point. Move on to the next camera and you’ll have them all running in no time.
Enjoy your new surveillance system!